TPM is the acronym for Trusted Platform Module. It is a microcontroller embedded in the motherboard of computers manufactured since 2016 that provides security features to the operating system.
Since the security system provided by the TPM chip acts at the hardware level, it is very effective against intrusion and theft of sensitive data through software-based attacks.
The TPM chip in its version 2.0 has achieved wide notoriety for being one of the requirements to update to Windows 11 from Windows 10, or in any case to make the Windows 11 experience fully fulfilled.
How to check if your PC has a TPM 2.0 chip
Most models of laptops (and desktops) manufactured as of 2016 are compatible with this hardware element, so there would be no major problem for users when they want to install Windows 11. There is also a way to check it and that is The next.
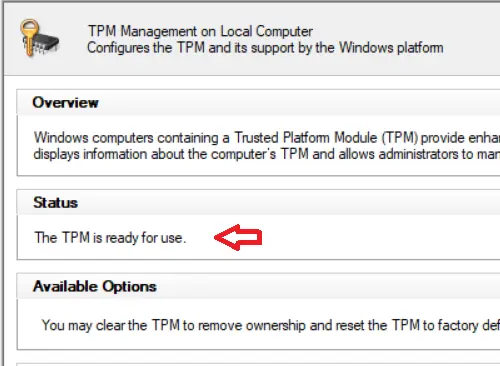
Press the Windows + R keys at the same time to open the Run box. Then type the command tpm.msc and click OK.
If your laptop is compatible with the TPM chip, the message that this element is ready to be used should appear.
How to enable the TPM chip from the BIOS
However, there is the possibility that in certain older computer models the TPM chip is disabled by default, but this is not a problem since its activation is very simple and is done from the BIOS or UEFI BIOS of the PC.
Here we show you how to do it for the most popular models of Lenovo, Dell and HP computers.
Enable the TPM chip in a Lenovo PC
First of all, enter the BIOS of your Lenovo PC. The best way to do this is by using the recovery options in Windows 10. Follow these steps.
Go to Start > Settings > Update & Security. In the side menu, click Recovery. Then scroll down to the Advanced startup section and click Restart now.
Once the blue screen appears, select Troubleshoot. Then select Advanced Options and click UEFI Firmware Settings. To finish, click Restart.
Once you are in the BIOS screen, open the Security menu and select Security Chip. Make sure this option shows as Enabled.
Finally, check that the Security Chip Type option shows the abbreviation TPM.
Enable the TPM chip on a Dell PC
Restart the computer.
When the Dell logo appears, repeatedly press the F2 key.
Once the BIOS screen opens, proceed as follows, taking into account the model of your PC:
On Dell Inspiron
Select Security and change the value of the Intel Platform Trust Technology option to On. Save your changes and select Exit to exit.
On Dell Latitude, OptiPlex, Precision, and Vostro
Expand the Security section. Then select TPM 2.0 Security. Next, select TPM On.
Save your changes and select Exit to exit.
Enable the TPM chip in an HP PC
Turn on the PC and repeatedly press the F10 key. In the Security tab change the value of the TPM Device Status option from Hidden to Available.
Then change the TPM State to Enabled.
Press F10 to exit the BIOS setup menu and select the YES option to save the changes. If necessary, press the F1 key to exit and restart the computer.