
Keeping a backup copy of the drivers for hardware components and peripherals installed on our computer ensures that in the event of any hard drive failure it is easier to reinstall. It also allows us to share them with our other computers running under the same operating system that need to use a specific peripheral, for example a webcam.
There are many programs capable of extracting the drivers installed in an operating system and saving them in a folder on the hard disk or on a USB memory, however, you have to pay a certain amount of money to acquire the license. That is why we offer you a free and very effective solution, as it is, it is published on a website associated with Microsoft. It consists of executing a simple tool that is opened from the command line and copies the drivers to a folder chosen by the user. Here’s how it works.
How to save a backup copy of your PC drivers
First, download the Harvest Drivers tool from the following address: https://msdnshared.blob.core.windows.net/media/2016/12/HarvestDrivers.zip.
Extract the files from the HarvestDrivers.ZIP folder. Then locate and run the HarvestDrivers.exe file.
In the command line interface that opens, enter the destination folder (it can be the port a USB memory is connected to. Here E:) and press the Enter key.
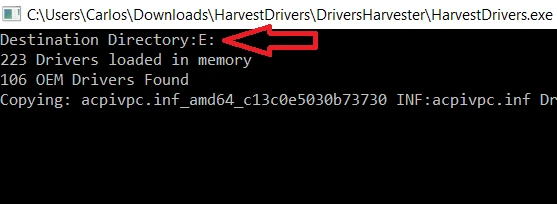
Wait a few moments for the files to be copied to the selected drive and press Enter to exit the program.
You will notice that two new folders have been created containing the drivers currently installed on your PC: LoadedOEMDrivers and OtherOEMDrivers.
When you need to use the drivers on a new hard drive, instruct the operating system to look for them on the computer. In Windows 10, use the Browse my computer for drivers option and then specify the location of the folder or USB memory that contains them.