One of the widespread uses of Raspberry Pi computers is as a multimedia center, either with the software provided by the Raspberry OS distribution (formerly Raspbian) or any other that integrates Kodi.
Its seamless integration with Linux and its affinity with open source systems also allow independent developers to promote interesting projects based on its multimedia capabilities.
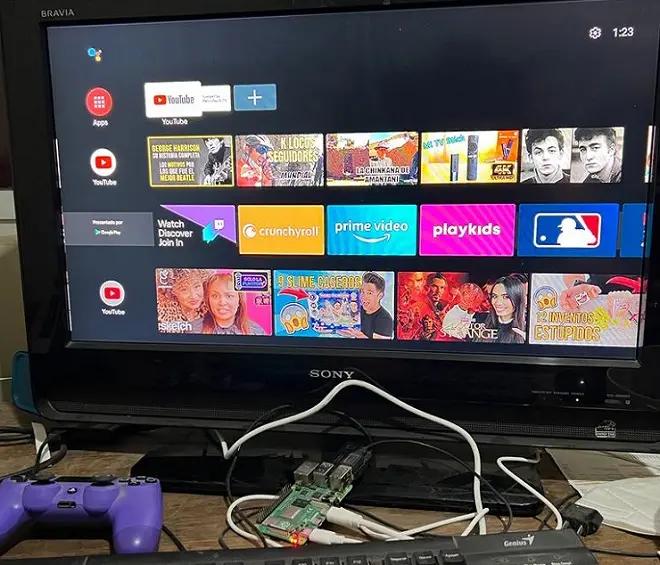
This is the case of the developer KonstaKang who has published a version of Android TV that is fully compatible with Raspberry Pi 4. This version is based on Lineage OS, which in turn is an Android fork developed from the Android Open Source Project.
How to install Android TV on Raspberry Pi 4
The way to install this version of Android TV on the most powerful version of Raspberry to date, that is, the Raspberry Pi 4 board, is very simple and can be started from Windows with the installation of the operating system compiled by KonstaKang and its subsequent flashing in the SD card. This entire process is summarized in the following lines.
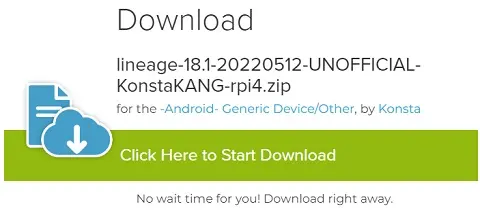
Open your internet browser and go to the developer page to download the Android TV build for Raspberry 4 based on LineageOS (version 18.1). Here we leave you the direct link.
Also download the Google Apps package and the build update. Both download links are published on the Konstakang page and we offer them to you here as well.
These compressed files in ZIP format copy them as they are to a USB stick. Once this is done, connect it to a USB port on the Raspberry.
Now download the Balena Etcher tool from its developer’s page. Run Balena Etcher on your PC and move the Android TV OS to the SD card.
Once the process is finished, insert the Micro SD card into the Raspberry computer, turn on the computer and wait for the system to load.
The initial screen will suggest pairing a Bluetooth remote. For this, a generic game controller and even the PS4 DualShock controller can be used. To put this latest accessory in pairing mode, you can review the following article.
Continue with the basic configuration of the new system. Once this process is complete, activate the option to enter Recovery mode. To do this, go to Settings > System > Buttons and slide the switch for the Advanced Reboot option to the right.
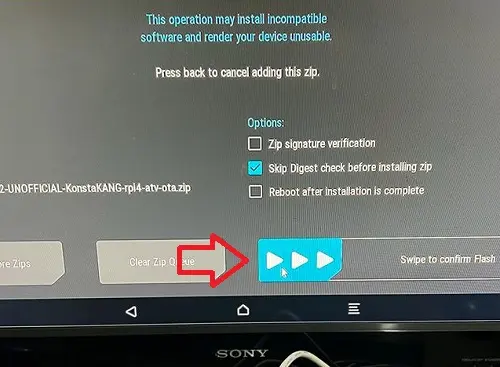
Once done, go to Settings > System Reboot and select Recovery. It only remains to install the Google Apps package and the build update from this section. For this, click on Install, then click on Select Storage and select USB.
Next, select the Google Apps package and slide the Swipe to confirm Flash option to the right. Repeat the process with the build update file. For these steps you can use the mouse.
Once done turn off the Raspberry computer and turn it on. After this, you will only have to access your Google account and configure the new system just as you do on a smart TV or TV Box Android TV.